
A Quick Review of How Seed Potatoes Grow

4 Tips for Growing Better and More Potatoes
1. Don’t count on using grocery store potatoes to grow in your gardens. These have usually been treated to make them less apt to sprout. Seed potatoes at garden nurseries, like Rainbow Gardens, are actually from pieces of tubers containing one eye or more. Get yourself the real deal.
2. Grow potatoes at the right time of year. In San Antonio, the best time to grow these veggies are late January through February. Don’t attempt growing these in summer. That means, now is a great time to load up on our selections. Look for varieties like White Kennebec, Red Lasoda, Yukon Gold, and Red Pontiac.
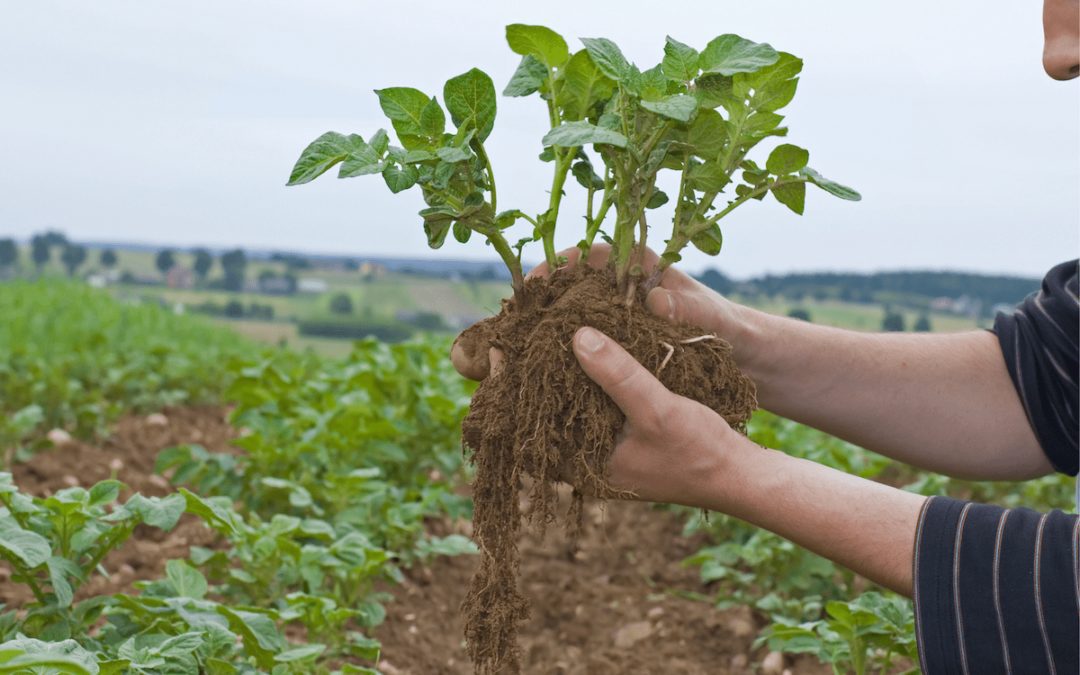
3. Offer potatoes plenty of sun, well draining soil, and consistent water.
- Provide 6-8 hours full sun minimum.
- Best soil pH is neutral to slightly acidic. Provide plenty of organic matter and your potatoes should happily grow.
- 1” of water per week minimum. They don’t tolerate drought well. Mulching around plants will help.
4. For increased yield, fertilize with muriate of potash (for synthetic option) or Sul-Po-Mag (for organic option).

Planting Methods for Potatoes
“Trenching and Hilling a Row”:
- At preparation, the depth of your soil should be at least 12” deep. Dig a 6”deep trench into your prepared soil and space tuber pieces 10”-12” apart with their eyes pointed upward. Cover with 2”-3” of soil.
- As the plant grows, the tuber under the soil must stay covered by soil or it can turn green. When the leafy part of your plant has grown about 4”-5” pull more soil from the sides of the trench and “hill” it up around the sides of the plant, covering the tuber as it grows.
- About 2 weeks after planting, you can fertilize by using one of the products mentioned above in the “for increased yield” tip. Follow the directions on product bag, and apply the product by scratching it into the soil alongside the plants.
- Continue to hill the soil around your plants as they grow to make sure the underground, growing tuber is never exposed. (Yes, this means you cannot set it and forget it!)
- Depending on potato variety, weather, and growing conditions, harvest time is usually around 2-4 months after planting. Flowers will develop and this is a good sign that the tubers are on their way to maturing. When the tops of your plants turn yellow and begin to die out it’s time for you to dig in!
Containers: Fabric Grow Bags are also a great way to grow containers. The breathable fabric allows air to circulate, and water to drain efficiently and the fabric is sturdy. Soil like FoxFarm’s Happy Frog, full of rich, organic material and micronutrients, is a great choice to fill up your containers.
I want to be a great potato farmer.
We hope you DO become a great potato farmer! Best of luck!
Can I grow my potatoes in black buckets with holes at the bottom?
Absolutely! We love growing potatoes in containers and grow bags. Make sure those holes are plentiful to have great drainage.
It gets too hot in containers and grow Bags. I’ve tried both. The Potting soil gets too warm.
Hi Pamela,
We’ve had some success with grow bags. It definitely takes some water, and few times we’ve had to move them around to find the perfect spot. Maybe next year you could try the trench method in a garden bed. Good luck!
Starting my seed potatoes in tires this year
We would love to see pictures of your progress! Best of luck to you!
You mention to “continue to hill it up on around the sides of the plants” that are in the ground. Is there a different method to follow if you use fabric grow bags?
Hi Gilda,
“Hilling” is just a fancy way of saying to add some soil around the growing stems at the bottom of your potato plants. Keep a bag or bucket of extra prepared soil and just scoop some of that to add to your potatoes as they grow. Good luck!
So what do you do come summer time? Is each plant one and done? How can you save some eyes for the next season?
Each plant is one and done, BUT, you get a lot of potatoes out of each plant! Your new seed potatoes will contain eyes. Harvest a few to use as plantings the following year. Harvest, but don’t wash off dirt, store potatoes in a dark, cool area (35°-45° is best temp). You’ll know if the area you are storing them is too warm, as too much warmth causes potatoes to break dormancy and start to sprout. Hope this helps. Happy planting.
Just by new seed potatoes each year. Keeping your own is less productive unless you can plant fall crop also. Then keep the small potatoes in frig for 3 or 4 months to plant in September in south Texas. Be sure to rotate crop area. Don’t plant in same row or container year after year. This incorages disease. Fresh soil and compost is best for any crop.
What I want to know is what we’re supposed to do if it freezes ?! Won’t the potatoes turn to mush if we get a hard freeze ? I’m so hesitant to plant now …..
Try covert entire plant with hay or stray during hard freeze. Planting deep keeps them protected. I plant Valentine’s day or around then . 2 to 3 weeks they are merging and usually no freezes by then in south Texas. But a frost happens. Just toss hay over plant then move aside after frost passes.
Thanks for the extra input Vivian. We love to hear from others who have planted successfully!
Last year I did an experiment with some red potatoes that sprouted in the pantry. I cut them in peices and had a pretty good yeild with just 1 grow bag. Will do more this time.
Don’t you love it when experiments work out? That’s awesome!
Is it even worth TRYING to grow potatoes in the fall? Like planting chitted starts around October first? I have several gardening calendars for our area – some don’t show fall potatoes, but some have potatoes going in again in August-September! That seems too warm to me, but what do i know… thanks
Do you live in San Antonio? Our recommendation is late Jan through mid March (at the latest), No need to chit potatoes when planted then.
Yes, around the Timberwood area.
Wait until late Jan – mid March. It’ll be your best bet at success.
Hi, there. Brand new gsrdener here with a not-so- green rhumb. I asked a friend who grows potatoes here in New Braunfels area about where to plant potatoes in my yard and she mentioned in the shade your article says 6-8 hours of full sun. This is the kind of thing that confuses me. I have a very open and sunny back and front yard, with very little shade. Currently we don’t have any mature trees that give shade either. Can you clarify whether I can grow potatoes in shade or not ? I already built the grow bed in the only shady spot in my yard but now I’m wondering if I should move it to a direct sun area ? Thank you
Potatoes need at least 6-8 hours of sunshine to grow healthy and robust.